Articles by "Attack Strategy"
Showing posts with label Attack Strategy. Show all posts
Clash Of Clans Tips and Tricks, Attack Strategies, War, Farming, Trophy Layouts, Great Planning, Donations and More From TEC-Clashzz Team. Join Today
Farming Elixir Strategies & Tips | TEC Clashzz
Farming regular Elixir is getting harder and harder and here you will find the best tips to get Elixir.

If you’re Town Hall 10 or above you might have a problem gathering enough Elixir for your upgrades – TH11 & TH12 especially has a lot of problems upgrading the Grand Warden and the new levels for the troops.

With every upgrade to your troops and every Army Camp space you unlock, the cost of your army is getting higher and higher in Elixir and that results in lower profits in Elixir – sad but true.

Grand Warden, Siege Machines, Army Camps and the Lab Upgrades don’t come in cheap, so I decided to put together this guide here to help you farm the Elixir needed.

Elixir Farming Basics

Let’s start with some basic tips first before I will show you the strategies for farming.

I know quite a lot TH11+ farm in Crystal League which is totally fine if you’re going for Gold or Dark Elixir – regular Elixir, however, is a little different to farm as you always have at least 200,000 Elixir in army costs, no matter if you’re farming with Goblin Knife or any other cheap composition.

I recommend you to go up to Champions League as a big part of your profit in Elixir is coming from the League Bonus and the Star Bonus – and both are connected to the league you’re in.

Farming Elixir Strategies & Tips | TEC Clashzz

I’m personally farming in Titan League and you see that the League Bonus is making up completely for my army cost and all resources I find in a base is my net profit. The Star Bonus also comes in daily with a nice extra 850,000 Elixir and that let me farm additional 6-10 million Elixir per week – just by farming in Titan league instead of Crystal league as a Town Hall 12.

Of course, if you’re TH10 you should go to the Champions League to find good bases to attack

All you need to do is to get 70% destruction and you will have all your army costs back in your storages and that’s something you can get against pretty much all bases.

I know many people out there love to farm in the lower leagues to get the whale bases offering 1M loot, but you see that when you go for Elixir you will need to cover your troop costs and when you find a base offering 300k in Elixir (which is already pretty good and nothing you see around every corner there), you will only make 100k profit because the league bonus will not cover your army costs.

That’s just my opinion and experience after many years of clashing 

Army & Attacking Tips for Farming Elixir

First of all, your army is the second big thing you need to adapt when farming Elixir.

Might you remember my Dark Elixir Farming Guide? There’s a good explanation for why the army should be cheap in costs of what you’re farming.

Wrapping it all up, you can’t effectively farm Elixir if your army is expensive in Elixir.

So, obviously, the only thing you can do is adapting it so you use more Dark Elixir and get the costs in regular Elixir lower. I’m not saying your army should only cost Dark Elixir (this would also make you broke in Dark Elixir), but you can easily adapt armies.

Let’s take a look at this army adaption here:
Farming Elixir Strategies & Tips | TEC Clashzz

With pretty much the same army and attacking strategy, you can 70,000 Elixir by investing 700 Dark Elixir – a deal that will make you a good profit over time.

Let’s say you do 4 attacks per day, you will save 2 million Elixir without changing one single habit or style of attacking per week – and you can go even further by using more Haste Spells and Minions.

With such army adaption, you can change pretty much any army easily.

Attacking Strategies for Farming Elixir

I personally prefer LavaLoonian as you can also use this while heroes are upgrading because it’s not dependant on the Queen Walk and can still get you the 70% 1-Star & 2-Star needed with a nice profit in Elixir.

Still, BoWitch is less expensive in Elixir and those of you who are really into Bowlers can use it to get loads of Elixir.

Conclusion

Farming Elixir is a pain, especially when you just upgraded to a new Town Hall and see all the new stuff you need to upgrade while still paying for your army. I really recommend you to make a priority list of what you want to upgrade with your Elixir as it’s not possible to farm dozens of millions of Elixir that fast – I always have like one Elixir Upgrade and Lab research active.
Clash Of Clans Tips and Tricks, Attack Strategies, War, Farming, Trophy Layouts, Great Planning, Donations and More From TEC-Clashzz Team. Join Today
Clan War Leagues – How to win & How to take part | TEC Clashzz
Clan War Leagues are released and I think many of you don’t know how this whole league system works, how to take part and how (and what’s) to win in War Leagues. Reason enough for me to write this guide here.

How Clan War Leagues Work

Once per month the War Leagues are taking place for 1 week. So it’s like the Clan Games but not that frequently. Supercell wants to make sure to not give away the powerful rewards too easily. So, when the War Leagues are taking part, you will see that in your events tab where also troop events and Clan Games appear.

Once the War Leagues start, you can sign up your clan and also choose the members that take part. The fights are always 15v15 but you can take more clan members to the war leagues – actually you can take all of them if you want to.

Now there’s the matching that will place your clan (with all the participating accounts) against 7 other clans that you all will fight – each day of the week there will be one battle against another clan in your league.

During every battle day, you have 4 hours preparation time where you can select which 15 members will actually fight the other clan, donate clan castle troops and so on – like in real Clan War but faster.
Important! You will also get the victory rewards if you’re signed up, even if you’re not actively fighting in a battle – of course, actively battling will grant you additional rewards for gaining stars.
Every victory and every star you score will add up the League Medals you get at the end of the season (= the week) – of course, the higher the war league your clan is in, the higher they are.

After that, you can use the League Medals in the new shop and get magical items and special decorations with them.

During the battle day, you only have 1 single attack on each round (instead of the 2 in regular Clan Wars).

This means you don’t have the scouting information of earlier attacks against this base, making the tactical part a little less than in regular Clan Wars.

How To Win War Leagues?

You collect stars during the attacks and at the end of the week, or war league season, all stars that your clan collected are added up to total stars collected during that 7 days.

The 1-2 best clans (depending on the league) will be promoted to a higher league and the bottom 1-2 clans will get demoted to a lower league.

Also, the leader can give bonus medals to the 4 members that he thinks deserved it most (himself, most attacks, best attacks, most stars collected etc.)

Conclusion

War Leagues are not here to take over regular Clan Wars, they are a fast-paced version one-time per month event that can reward your clan some really nice benefits with the hammer magical items. Engineering doesn’t make any sense here as your initial league will get chosen upon your best 15 Town Halls – if you try to get easier opponents, you get a lot fewer rewards so it’s just cheating yourself and your clan by doing that (and climbing that ladder with only one possible promotion to a higher league per month takes forever).
Clash Of Clans Tips and Tricks, Attack Strategies, War, Farming, Trophy Layouts, Great Planning, Donations and More From TEC-Clashzz Team. Join Today
Ultimate Guide to 3-Star in Versus Battle | TEC Clashzz
DO you have one or two strategies in Versus Battles that you use all the time and you feel that you’re stuck at a certain trophy range? Do you ask yourself how some people get up to 5,000 trophies and more? The key to achieve this is that these people have mastered to use the perfect troop composition depending on the base they are matched up against instead of relying on only a few strategies.

In Versus Battles, there is no single base that will hold up against any attacker, every base has a weakness against a certain attacking strategy and that’s what I want to show you in this guide here – how you select the optimal attacking composition against any base.

The Key to 3-Star & High Percentage 2-Star Attacks


Like mentioned in the beginning, every base has a weakness and even against maxed out Builder Hall 6 bases you can score a high percentage 2-Star attack when you’re able to use the right strategy.

I know many people out there have their two primary attacking strategies like Baby Dragons, mass Night Witches or Archers they use all the time and I bet that you also use this approach and leave a lot of victories on the table because of that.

A victory is only possible when you get a very solid 2-Star attack and often times you find yourself in the situation that you have some layouts that you can’t get that result. Here’s a quick example – when using Baby Dragons you’re not very good at attacking diamond bases.

This is just one of countless examples to show you that this strategy with your primary attacking composition fails at the point where you have certain bases you can’t score a high 2-Star attack and have to hope that your opponent will fail to attack your base properly – a successful Versus Battle Clasher always relies on scoring high in his own attacks instead of hoping that the opponent is worst than himself!

Versus Battle Attacking Plan

The goal to achieve this is always the same, you will need to plan your attack in a way that will clear off the path towards the Builder Hall so you’re able to get the Builder Hall down plus score enough percentage points (what will be met in 90%+ of all times when you’re able to get the Builder Hall).

Your main objective to do this is often times to clear off the path to the Builder Hall with your troops and let your Battle Machine with some support go for the Builder Hall, so here’s what you have to check while scouting the base and planning your attack.

You will need to know which defenses can be a real threat to the potential troops you will use – or the other way around, which troops can clear me the way to the Builder Hall.

There’s always a way to exploit the setup of defenses and all you need to do is to know how to. For this purpose, I created you the following overview which setups are good for each attacking composition that will help you choose the right troop composition (plus I also have additional in-depth guides for each attacking composition that will help you).

Choose The Right Side

The following overview only works when you choose your path to the Builder Hall the right way, this means you will select the side and check the path to the Builder Hall for certain setups (shown below) to see which strategy will be working best.

Often times a base will only give you 2-3 options.

The Best Attacking Composition For Versus Battles

Here I have you different elements that will let you choose the right strategy to use, primarily it’s certain defenses in the path to the Builder Hall that will tell you which strategy will work and which one won’t.
Please mind! Of course you can get a high 1-Star attack despite my tips here, but they are for high 2-Star attack and potential 3-Star attempts 

Baby Dragons

Baby Dragons can clear a path to the Builder Hall effectively, but there are some things that you have to make sure:
  • You will need to clear the Crusher, a full hitpoint Crusher before the Builder Hall will make your Battle Machine fail in almost any cases.
  • Air Bombs located in the path you want to clean will cost you many Baby Dragons and you can easily fail to clear the Crusher or other buildings for your Battle Machine
  • Many Archer Towers (Fast Mode) and high-level Firecrackers will take down your Baby Dragons very easily
If one of these applies, you might want to choose another attacking composition!
no-Baby Dragons

If none of these apply to the base you’re going to attack, you’re good to go to use Baby Dragons.

Minions

Minions can be used more surgically compared to Baby Dragons, but there are also several setups that just won’t let Beta Minions clear the path to the Builder Hall:
  • Mixed layouts with high hitpoint buildings that are all in range of your Minions will force you to invest a lot more Minions because only their long range shots at the beginning are effective
  • Centralized Roaster will take them out fast, especially groups of them
  • Long Range Archer Towers that you can’t take out soon
If one of these applies, you might want to choose another attacking composition!
no-Minions

If none of these apply to the base you’re going to attack, you’re good to go to use Beta Minions.

Night Witches

Night Witches are often referred to as an inconsistent strategy, but in fact, you only need to know when to use them. Here are deal-breakers for Night Witches:
  • You will need to be able to take out the Multi Mortar soon when your tanking units (Battle Machine or Giants) will go down before they can take down the Multi Mortar your attack is doomed
  • Centralized Roaster will neutralize the Bats very efficiently so make sure that you can either prevent it or take it down together with the Multi Mortar early in the attack
  • Tanks will get down fast. This often happens with Double Cannons, Cannons, and Crusher located in the area where you will need the Battle Machine or Giants to tank – forget that, they will die too fast!
If one of these applies, you might want to choose another attacking composition!
no-Night Witches

If none of these apply to the base you’re going to attack, you’re good to go to use Night Witches.

Archers

Archers can take out structures layer by layer and with their Cloak ability, they can do it without having to fear damage. The only thing that will make them fail (besides bad deployment from the attacker) are certain setups):
  • Don’t use them in boxed layouts, when they have to pass a broken wall to reach a large part of the buildings, they will fail
  • No chance to get the Crusher out of the path
  • You should get at least 40% with your Archers to get a 2-Star attack, so don’t try it on bases where walls protect most of the base buildings
If one of these applies, you might want to choose another attacking composition!
no-Archers

If none of these apply to the base you’re going to attack, you’re good to go to use Archers.

Barbarians & Bomber

Barbarians and Bombers are very effective because walls are not something you have to mind that much and you can funnel your troops more like you desire instead of working them along the wall structure of the base you’re about to attack. Still, there are several things that will make them fail big time:
  • Crushers in between the path to the Builder Hall are something you can’t prevent your Barbarians to run into – dooming them to an instant death and making your attack fail. If they are on one side of the Builder Hall, you can come in from the other one
  • Multi Mortar & Roaster tanking! If they are located in centralized positions that take a while for you to reach, they will melt down your Barbarians fast and easily
no-Barbarians

If one of these applies, you might want to choose another attacking composition!

Conclusion

As you can see this will help you to attack any base and EVERY base out there can be beaten with a high percentage 2-Star attack. If you got some more examples and deal-breakers for certain strategies, please let me know in the comments.
Clash Of Clans Tips and Tricks, Attack Strategies, War, Farming, Trophy Layouts, Great Planning, Donations and More From TEC-Clashzz Team. Join Today
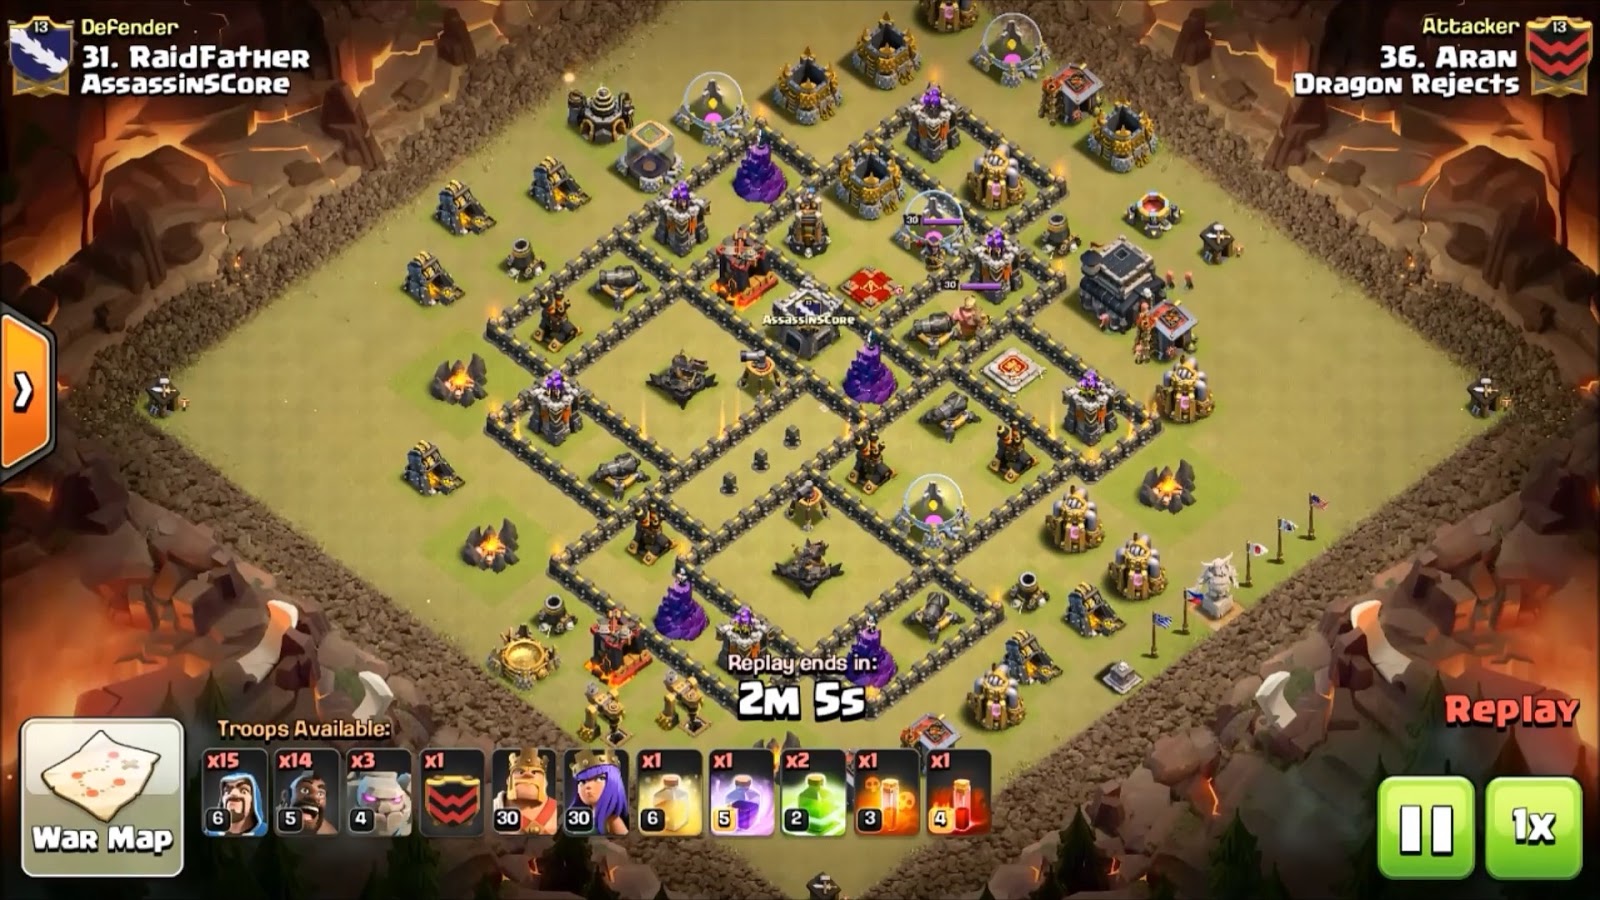
Several years ago when Clan Wars was first introduced to the game, the Hog Rider was a troop in its prime. For any that were willing to spend thousands of Dark Elixir, a mass Hog Rider attack was nigh on unstoppable and with aspirations to win successive clan wars many players adopted it as a go-to strategy for three starring high-level opponents.

Naturally, the ease with which Hog Riders were able to destroy a Base led to many complaints from players and with this in mind Supercell began making some heavy balancing changes. Over time, with the addition of giant bomb damage multipliers, increase point defense damage and the loathsome skeleton traps, Hogs became harder and harder to use to good effect at a high level. People turned to other options for more reliable success, such as Balloons, and the Hog Rider, whilst being an iconic troop, started to fade into obscurity.

However, the time of the Hog Rider very much seems to be back on the rise. With several buffs to hitpoints over the last few months, the removal of the giant bomb damage multiplier and crucially the introduction of the unstoppable Bowler, Supercell have given renewed purpose to the shrill voiced, big armed, hammer wielding tower wrecker. Supercell simply couldn’t let such a popular troop walk the long road to irrelevance, and with the pioneering spirit of Clash players the ‘Stoned HoBo’ raid was forged, and Hogs once more became firmly established as a dominant war troop, with the support of a heavily spell invested GoBo Killsquad, mainly at Th9.

How Stoned HoBo Works


This attacking strategy is pretty consistent with the Classic GoHo. But, the addition of Bowlers makes this strategy a little different and a lot more effective.

Essentially, you have to trigger or neutralize at least one double Giant Bomb spot with your Killsquad which comprises of 3 Golems (Stoned), Clan Castle Bowlers, some wizards and your Heroes.  The 3 Golems will tank the rest of the Killsquad to get deeper into the base, allowing the Bowlers to start clearing from the center outwards. The Killsquad should get very high value, allowing the back-end Hog Riders to clean up the base with relative ease.

Which Town Hall level does Stoned HoBo work?

Townhall 9

Pros of Stoned HoBo


  • High success rate in Clan Wars.
  • Easy to execute, as it’s just a modification to a classic strategy.
  • Requires less focus on the Hog Rider phase than a classic GoHo, provided the Killsquad brings high value.

Cons of Stoned HoBo


  • Extremely expensive in terms of Dark Elixir outlay.
  • Requires max level Golem & Hog Rider for the respective Town Hall level, with high-level heroes to carry the Killsquad to the core.
  • Can fall apart if the Bowlers are not properly protected during phase one of the attack.

Main Purpose Of this Strategy


Clan Wars. This strategy is particularly effective against “Anti Threestar” base designs which are now common in intermediate to advanced Clan Wars.

Trophy Pushing is not recommended.

Army Composition for the Stoned HoBo


  • 3 Golems
  • 15-19 Hog Riders
  • 4-6 Wall Breakers
  • Rest Wizards and Clean-Up troops( Archers, Goblins)
  • Max Bowlers in Clan Castle (essential)

Spell Composition for Stoned HoBo


  • 1 Rage Spell
  • 1/2 Jump Spell(s)
  • 1/2 Heal Spell(s)
  • 1 Poison Spell
  • Poison spell in the Clan Castle

This is the most effective Composition for this attack strategy, but you can play around with it according to the design of the base you’re targeting. It is called “Stoned” due to the inclusion of 3 Golems. Variations of the strategy include “Shattered” (2 Golems) or “Cold-Blooded” (1 Golem), both of which substitute the removed Golems with more Hog Riders. It is advisable to prioritize the Killsquad more than the Hog Riders, in which instance I strongly suggest taking 2 Jumps to get through the base, allowing the Bowlers to capitalize on their long range attack.

Hog Riders will take care of the rest without the help of heal spells if the Killsquad achieves high value in the first phase. However, if your Hog Riders are likely to encounter double giant bombs during clean up it is advisable to take 2 heal spells, one of which can be used to keep the Bowlers alive should it be required.

Stoned HoBo Step by Step

1. Creating the Funnel

Like any other Go-Strategy, this also needs perfect funneling. Deploy Golems backed up with flanking Wizards and the AQ to make your way into the base. Set the funnel well! You’re relying on getting those Bowlers into the base!

2. Deploying Kill-Squad

When the funnel has been set, deploy the BK, followed by CC Bowlers. Drop Wall Breakers or a Jump Spell to get them into the heart of the base. Drop a Poison on the Defending CC troops. I recommend saving one poison for those pesky Skeletons which, as mentioned in the introduction, can devastate Hog Riders if left unchecked! Use Rage and/or Heal when the Killsquad hits the core. Bowlers under rage are a sight to behold; they’ll literally wreck the base, inside to out, in a heartbeat.

3. Clean-up the Remaining Defenses

When your Killsquad has decimated the core, loose your Hog Riders surgically (3-4 per defense). Drop Heal spell(s) as needed. Deploy rest of your clean up troops to sweep up the broken pieces of your opponents base for a 3-star victory.

This raid is without a doubt part of the Town Hall 9 Meta at the moment. Heavily invested Killsquads are becoming commonplace in many of the top Clan War strategies, and this really is no exception. If practiced well, and executed properly you’re assured of success; just remember to keep those Bowlers alive! Many Town Hall 9 Clan War raids now hinge entirely on Clan Castle Bowlers. That’s just five units which are instrumental to a successful attack, so don’t let them eat a couple of giant bombs on the way into the base!

If you focus on what you’re doing and master the Stoned HoBo, you’re well on your way to becoming a truly formidable attacker and will be a huge asset to your Clan during Clan Wars. In short, this is a fantastic raid to add to your arsenal and if you’ve already mastered the Witchslap and GoBoLaLoon raids (links below) you’re fully equipped to three star any Town Hall 9 on the War map. Who doesn’t want Sixpacks every war? Now go grab your hammer, saddle up your hog and SMASH those puny defenses to pieces! The Hog Rider is back in action, and he looks like he’s here to stay!
Clash Of Clans Tips and Tricks, Attack Strategies, War, Farming, Trophy Layouts, Great Planning, Donations and More From TEC-Clashzz Team. Join Today
Witches, released back in 2013, is the troop that has been buffed and nerfed more than any other troop in Clash of Clans. Witches were very powerful when they were first released and popular in the GoWiWi strategy for a long time but when Skeletons were nerfed to not trigger any traps anymore, they became one of the most useless troop. Witch had many buffs and nerfs after that but, they faced their biggest buff in the October 2016 update. Their HP was increased by a whopping 140% and some other changes were made.

After the Builder Hall 6 update, some bugs caused Witches spawning Skeletons relentlessly, even while they are walking. This caused the strategy now to be called the Witch Slap, though the bug was fixed, the strategy is still extremely powerful, especially at Town Hall 9. Now, let’s have a look how does this work.

How Witch Slap Works

Witch slap is pretty easy to execute in general.

Drop 4-5 Witches with a couple of Healers on two corners of the base.

When the funnel is created, drop a Golem followed by 2-3 Wizards and Archer Queen, deploy the Barbarian King and the Bowlers from your Clan Castle – this will decimate the core while your Witches are taking care of business on both side (the sides you’ve chosen in the beginning depending where you deployed them) of the base.

However, there are some points you need to be very careful about; e.g. the funnel has to be accurate. If the funnel has been made wrong, Healers will leave the Witches and aid your main kill squad, leaving them highly vulnerable – as you can see here:
This can cost you the 3-star victory. So, let me explain the main part of this strategy but, right before getting to that, let’s have a look at some other stats regarding this strategy.

Which Townhall Level does Witch Slap Work?

  • Townhall 9

Pros of Witch Slap

  1. This Strategy works on a variety of bases and can easily sweep away most of the popular anti 3-star bases (except for those which are anti-witch)
  2. High Success in Clan war

Cons of Witch Slap

  1. Extremely expensive in Dark Elixir
  2. Both of the Heroes need to be at a decent level

Main Purpose of this attack

  • Clan War
Trophy pushing with this strategy is not recommended.

Army Composition for Witch Slap

  • 8-10 Witches
  • 4 Healer
  • 1 Golem
  • 2-3 wizards
  • Fill with clean-up troops (Archers, Goblins etc.)
  • Max Bowlers in the CC
Spell Composition for Witch Slap
  • 2 Jump Spell
  • 1 Rage Spell
  • 1 Healing Spell
  • 1 Poison Spell
  • Another Poison Spell in the CC
Of course, you can play around with the composition depending on the base you’re attacking, but you should have 8 Witches and 4 Healers at least.

Now, with all that being said, let’s get into the main thing.

Witch Slap step by step

This attacking style is not at all that hard to understand. The basic criteria of this strategy are:
  • Split your Witches & Healers into two groups, each consisting 4-5 backed up by 2 Healers
  • Choose the correct side to commence the attack and drop the groups on each corner
  • As soon as the funnel is set up properly, drop your Golem followed by a couple Wizards and the Archer Queen
  • Drop the Wall Breakers as needed & use Jump Spell(s) to open up the base
  • Deploy your Barbarian King and the Bowlers from your Clan Castle
  • Drop the Rage and Heal Spell(s) as needed when your kill squad reaches the core
  • Poison Spells on defending CC troops
  • Clean it up
Pretty easy, huh? Well, not at all.

There are two things you need to be very careful about when you’re going to use this strategy:
  • Scouting the right base
  • Creating the Funnel

1. Scouting

There are several things that you need to look for when you’re finding a base to attack with this strategy.

A) The location of Air Defenses

Healers are the main support troop of Witches, respectively Skeletons. They will help her overpower the splash damage buildings (like Mortar & Wizard Towers). If the Air Defenses are offset but out of the range of Witches, then they can easily shoot off the Healers making your Witches highly vulnerable and after that, all of her Skeletons are dead so the point defenses will kill them easily.

B) X-Bows and splash defenses

Another thing you should be careful about is X-Bows. Only X-Bows can really kill your Witches while they are being healed by Healers, so if Witches are targeted by an X-Bow and any other point/splash damage, your Witches will possibly die one by one before even your kill squad reaches the core.

Also be careful about offset Wizards Towers! If the base has none of these defensive features you’re good to go with this strategy.

2. Creating the Funnel

The Funnel is the key for any successful attack. Nobody wants his/her troops to go right around the base instead of going to the core.

The funnel has to be right and the groups of witches should be far away from the Kill Squad or the Healers will simply leave the Witches!
So, make sure that the healers will stay with the groups of Witches and then nothing’s going to hurt the ladies and they will just slap the defender away for a 3-star victory.

Conclusion

All in all, I find this strategy very delightful and I use this pretty often since I’m a TH9 myself. With all those “Larry’s” all over the base, it’s fun to slap someone. But, people have started to defend against this strategy (but by far not everybody).

I still find some bases pretty easy to Slap and I wanted to cover this strategy before everybody starts defending against it so that you guys who are unknown to this strategy yet, can have some fun with this. Check our guide on defending against witches here.

Now, as always, let me know in the comment section down below how’d like it and also ask me questions, suggest me some ideas regarding guides that I should or you guys want me to do.
Clash Of Clans Tips and Tricks, Attack Strategies, War, Farming, Trophy Layouts, Great Planning, Donations and More From TEC-Clashzz Team. Join Today
Night Witches are the only attacking strategy that is able to get you 3-Star victories at Builder Hall 6 and also often times you will have high percentage 2-Star attacks – in return, you can also fail big time with Night Witches. In this guide, I’d like to show you some tactics that will get you more victories and minimize the number of attacks that fail.

Night Witches in Versus Battles


Night Witches summon Bats that will swarm up and deal damage ahead of the Night Witches, so keeping the Night Witches alive as long as you can is your priority.

In general, you shouldn’t do Night Witch attacks when your Night Witches are not at least at Level 10 because a number of Bats they summon is vital for this attacking strategy.

I’ve been writing about other Versus Battle attacking strategies lately, like Archer, Barbarians, Minions or Baby Dragons and the key for these strategies was always the deployment timing and using them surgically.
Night Witches are indeed the only serious attacking strategy that you will use by spamming the Night Witches, but that doesn’t mean it’s a strategy of deploy-and-pray style – you will have to plan your attack very accurately in terms of when and how you use your Battle Machine that makes it the opposite of a no-brainer.
Attention! Night Witches are yet very powerful but also inconsitently – several attacks can simply turn out with 30% or less for bad luck in timing. However, you can also get 3-Star victories where all other attacking straegies fail.
So the simple attacking protocol is always the same:

  • Deploy your Night Witches from a distance (to get the Bats in as early as possible)
  • Deploy your Battle Machine to tank the Multi Mortar & Roaster

Now I will show you some practical tips that I gathered from my past like 200 Night Witch attack.

How to win with Night Witches


First of all let’s talk about the composition. I know some people like to use 1 Army Camp with Boxer Giants along the Night Witches for tanking.

In my opinion, the results are better with using only Night Witches because the 3 Giants will go down so fast:
  • Walk ahead of the Battle Machine because they target defenses
  • Get caught by Spring Traps early
  • With all point defenses on the Giant, it will die before the Night Witches even reach the base

Night Witches Deployment

Ok, I think everybody using Night Witches know that they should get deployed in the very corner of the map so their Bats can clear off some buildings before they even reach the area of the base.

In addition, you should always deploy one of your Night Witches like 2 seconds in advance to the others for two reasons.

If there’s a Mega Mine in the corner you won’t lose your whole army (that happens sometimes)
The next reason is that many people have set their Mines to air mode in the corners so the first few Bats will trigger them and the majority of Bats in the first wave will survive:

Planning The Path


Planning the path is extremely important and you always want to mind this:

  • The Multi Mortar has to be destroyed before your Battle Machine gets destroyed
  • The Roaster should not be able to target the Night Witches directly in their path
  • When you see locations where Mega Mines or Spring Traps are obvious, you will need your Battle Machine to walk through that area first

So, when selecting the corner where you deploy your Night Witches and the location where you deploy your Battle Machine are all about that.

Here is some example where I show you why I deployed them at the given points:

First Base
As you can I was deploying the Battle Machine at a spot that will let it walk towards the Roaster and be the target of the Multi Mortar and the Roaster all the time as long as alive – in the meantime, the Bats should eat their way through to the Multi Mortar and then support the Battle Machine.
I also waited with the Electric Hammer until the wall was destroyed because I didn’t want my Battle Machine to walk in there too early to not get down too fast, all I needed it, in the beginning, was to be the target of the Multi Mortar.

Because of the open spot in the wall from the Battle Machine, the Night Witches will walk there as well where the Battle Machine already cleaned. The Multi Mortar is not directly in range of the Air Bombs or the Roaster, so the Bats will destroy it quite fast.

Second Base
This second base was a little more tricky because the Roaster can destroy all Bats that target the Multi Mortar and when the Battle Machine gets too close to the Multi Mortar it will start to shoot at the Night Witches. In addition, I need to be careful that the Guard Post troops don’t drag my Battle Machine directly into the Crusher.

That’s why decided to get the Battle Machine in from this position so it will also tank the Roaster for the Bats so they can get the Multi Mortar down fast. On the right side, there’s also no danger that the Multi Mortar will lose aggro on the Battle Machine and with all Cannons on the bottom of the base the Battle machine will last long enough until the Night Witches get the Builder Hall down.
As you can see, my plan turned out good and I think I even made the 3-Star on this attack

Third Base
This base was a little bit more tricky, the Air Bombs are directly next to the Multi Mortar and there’s a lot of hitpoints in front of it. I decided to make my Night Witches walk the longest path possible to gain time while the Battle Machine should also be delayed and take time with the Guard Post troops.

All I was focusing on is giving the Bats as much time as possible to go for the Multi Mortar because I knew that it would take like 5-6 waves of them to clear off the Multi Mortar.
My plan worked out, although 2 Witches decided to break the wall instead of walking around it

Conclusion


I hope you learned that the most important part of this attack, even though it’s a “spam” attack, is that you plan the path of your Battle Machine right. If you don’t do this, Night Witch attacks will be nothing else than lottery games!

In my opinion, there are not more than 10 different layouts out there (in terms of the general structure), so you have plenty of time to work on different positions of your army and see what returns the best results. For example, the layout of the second base, the Diamond Base, is something that comes in every third battle and I know how I need to deploy my troops now to get either a high 2-Star of also a 3-Star victory.
Clash Of Clans Tips and Tricks, Attack Strategies, War, Farming, Trophy Layouts, Great Planning, Donations and More From TEC-Clashzz Team. Join Today
Sneaky Archer attacks are common, even at Builder Hall 6 and they bring in solid results when the attacker know what to do, solid 2-Star attacks are not a problem at all. In this guide, I will show you all you need to know to succeed in Sneaky Archer attacks.

Sneaky Archers in Versus Battles


The biggest strength of Sneaky Archers is their ability, the Cloak, that will keep them hidden from all defenses (except traps) for up to 10 seconds letting them deal their damage silently without anything that will happen to them.

With up to 10 seconds, the damage they will deal is quite high:
  • Level 10: 371 damage before Cloak disappears
  • Level 11: 406 damage before Cloak disappears
  • Level 12: 580 damage before Cloak disappears
So, when using Sneaky Archers, you can use them without a tank because they can deal a lot of their damage without a tank needed and the damage can be, as you see above, a lot.
Usually, when using Sneaky Archers, your battle protocol is always the same:
  1. Use your Archers extremely surgically to clear the path into the base
  2. Try to remove the Crusher in front of the Builder Hall
  3. Send in your Battle Machine to go for the Builder Hall
Now I will give you some very helpful advice and also a nice infographic how you will do this in the most efficient way.

How to win with Sneaky Archers


There are actually only 2 things you will need to make sure and the victory will be yours:
  • Select your entry point properly
  • Don’t waste Archers by doing wrong deployments (I will show you in a couple of seconds what I mean)

Base Selection


Normally, you attack almost any base you want with Sneaky Archers, but be careful when you stand in front of such a base:
It’s simply hard to attack because Archers are limited to go into the base area and lose precious time of their Cloak ability and you might run out of time.

Sneaky Archer Deployment


Some might think back to the time when BARCH was used in the Home Village and deploy Archers like a Chinese Wall and pray for the best – in your Builder Base this won’t get you anywhere. Using Sneaky Archers is the most surgical attack strategy and you will send them in very smart and with a good timing to have success.

What I often see is people that send in one Archer and then wait and then send in the next one – this is inefficient and also will get you in trouble with the clock at the end of the attack. This also leads to the situation that sometimes there are more Archers send than needed and wasting Archers is something you want to prevent at any cost!

You always want to send in the EXACT amount of Archers needed to destroy the target building or defense to save time and also don’t waste your troops – a single Archer can destroy so much.

That’s why I created this cheat sheet here that will tell you exactly how much Sneaky Archer you will need to send in for any given building – remember, their Cloak leaves them protected so you can use these numbers to not waste a single Archer!
Why is this so important? Well, when not sending in all your Archers at the same time, you will get yourself into trouble. Here’s a classical situation I see often happening – the first Archer gets supported after a short time by more Archers. Her Cloak runs out sooner than the other ones and the Mortar will start shooting and the bullets will also hit the Archers that are behind a Cloak (as the Cloak only makes them invisible not invincible!)

Ranges of Sneaky Archers


Your Sneaky Archers have a range of 3.5 tiles, but this is always calculated from the central tile of their target. Let me show you this with this example here:
As you can see, The Archers are walking until they are 2.5 tiles away from the Army Camps. This is their maximum range here and they will not shoot at it when they are standing further away, they would walk closer.

When sniping outside structures and you want your Archer to be safe, you will need to know this to see if it’s safe or not for them.

It needs a little practice to get used to the ranges, but you can use these rules here:
  • 7 Tiles range of Double Cannon, Hidden Tesla & Archer Tower (Fast Attack): Needs 2 tiles between defense & target
  • 9 Tiles range of Cannon: needs 4 tiles between
  • 11 Tiles range of Archer Tower (Long Range): needs 6 tiles in between

Conclusion

I always hate watching a replay of Sneaky Archers hitting my base because I feel like my defenses can’t do anything while the Archers can work their way through every line. This attacking strategy is only using one kind of troops, but the way how it’s performed makes it so powerful and if you become a master at using Sneaky Archers, you can also use them far above 4,000 Trophies easily.

Clash Of Clans Tips and Tricks, Attack Strategies, War, Farming, Trophy Layouts, Great Planning, Donations and More From TEC-Clashzz Team. Join Today
Barbarian attacks are still very popular in Versus Battles, primarily because they are first troop people are going to max out. They can be used successfully in all Builder Hall Levels and you can always pick up a solid 2-Star with high percentage if you do the right thing – and that’s what I will cover in this guide.

Barbarians in Versus Battles

Raged Barbarians have their special ability that will give them a rage mode at the start when they get deployed dealing more damage and moving faster – this will help a lot when rushing into a base.

I always recommend to not use Raged Barbarians only, I always recommend using one Army Camp of Bombers as well because this helps a lot to break open the wall sections and let them go for the core and the Builder Hall.

So an attack with Barbarians often follow three simple steps:
  1. Use some Barbarians to take out the first layer of structures and tank for the Bombers that will open up the walls
  2. Get your Battle Machine in and send in more Barbarians until you get the Builder Hall
  3. Use the leftover Barbarians (if available) to get some extra percentage once the Builder Hall is down
  4. Of course, there’s a little bit more in detail about this attacking strategy and I will cover that now.
Mass/Rush Barbarians & Surgical Barbarians

There are two fractions in the community that use Barbarians for attacking – one of them uses the rush strategy and the other ones prefer the surgical strategy – I want to show you the difference.

The start of the attack is the same for both strategies but after the Bombers opened up the inner compartment so the path to the Builder Hall is open these two strategies divide. The mass/rush barbarian player will send in all forces to go for the Builder Hall while the surgical player will start deploying packs of 2-3 Raged Barbarians that will walk through the core area of the base.

Which one is better? Well, that depends on the details how the core area is designed. The surgical strategy is a little bit more difficult to use, but it offers several advantages:
  1. It can deal with a Crusher in the path to the Builder Hall
  2. It’s more viable to use when there are multiple structures in the way to the Builder Hall as you don’t risk that the big part of your forces might get funneled somewhere else than the Builder Hall
  3. Less vulnerable to the Roaster and Mines in general
Here’s a perfect example where surgical Barbarians work better than playing the mass Barbarians:
Mass Barbarians would either get stopped by the Crusher or (when the Battle Machine destroyed the Crusher) get distracted and go after the Archer Tower, Double Cannon, Guard Post and Firecracker while the Roaster and the Multi Mortar get them down fast.

Common Mistakes With Raged Barbarians

Some player still confuses the term “mass Barbarians” in a way that they send in all Barbarians in the beginning and then attacks might work or fail horribly (Barbarians walk into a Mega Mine, Crusher or the Bomber get killed too soon). This happens above 3,000 Trophies more often than you might think (I always have at least one of his attacks in my Versus Battle Log).

Mass Barbarians (or called Barbarian Rush) is the way how to clear off the Builder Hall once the wall layers are open! In the beginning, you will always deploy some Barbarians (I use 2 for normal buildings and 3 for each defense and storage on the outside) and then deploy the Bombers!
How to win with Barbarians

The most important part of winning your attack with a high 2-Star is to carefully choose what spot you will start your attack from. The spot you choose is determined by:
  • a path to the Builder Hall
  • preventing to have a Crusher when possible
  • be able to destroy the most dangerous defenses early, like Multi Mortar and Roaster
All of the will give you the best spot easily. When taking a look at this base, you will easily understand why attacking from the northern side is the best choice as you can prevent the Crushers and hit down the Roaster and the Multi Mortar quite fast on your path to the Builder Hall.
Also the funneling to the Builder Hall is quite easy once the Bombers broke the inner ring of walls.

The Bombers’ Life

The Bombers you carry have only one purpose and that’s breaking the layers of walls in front of your Barbarians until they can reach the Builder Hall. It doesn’t matter when they killed after they broke that layers of walls (although it might be helpful if they don’t die) – what I’m trying to say is that you have to pay extra attention to make them survive until they broke the wall and they you will focus on the next step.
When deploying them, make sure there is always some kind of tanking in front of them, no matter of that’s the Battle Machine or several Barbarians. I found it helpful to send in several new Barbarians in the beginning after a couple of moments to make sure there are always enough of them tanking.

Work Through That Core

Now that the core area is open, you will have to go for the Builder Hall. I already wrote about the surgical attacking part that I recommend to use, otherwise, you can see things like that happen:
That’s, by the way, an attack against my base where I like to have my Mines set up in the core to catch attackers that don’t use surgical attacking, so be careful about your deployment and timing when you want the Builder Hall.

Another advantage of not sending all Barbarians into the core, unless necessary, is that you might have some leftover Barbarians that you can use to clear off outside buildings when you already have the Builder Hall down to get a good amount of additional percentage points.
Conclusion

Barbarian attacks are successful when done right, even the Top100 Versus Battle Leaderboard Players use it against maxed bases. I also like to use it as an alternative when I see a base that is extremely hard to attack with Baby Dragons or Minions because it’s impossible to have a base that will defend well against ground and air attacks at the same time.

Clash Of Clans Tips and Tricks, Attack Strategies, War, Farming, Trophy Layouts, Great Planning, Donations and More From TEC-Clashzz Team. Join Today
This guide will be all about the new Th10 & TH11 attacking Strategy which was brought to light by two times CWL Champions “Dark Looters” – Yes guys, I’m talking about the CloneBone (DragLoon with Clone spell). Before, the June 2017 update, the Clone Spell was the least used Elixir spell because players could not get much value out of it for its 4 spell storage space. However, after the buff and a new level added, it is now being used with Dragons and Balloons more frequently which made this new strategy a very popular one among the TH10 & TH11 players who are dedicated to Clan War. Now, I’ll break this strategy into some little parts so that you guys can understand why this one is now trending.

How CloneBone works


This strategy works best against those bases which have offset Air Defenses. As you can see you’ll be able to take out a couple of ADs with your AQ and BK(with some wizards). And the other ones can be dealt with straight-targeting Balloons with the help of Rage/Haste spells.
But this doesn’t mean that you can’t attack those bases which have more like centralized Air Defenses that can’t be accessed with only Heroes as this example here
In these cases, your Heroes would be used for Funneling so that your Dragons go straight into the base. Once you’ve properly dealt with the ADs with minimal loss, other defenses won’t be able to stop you from getting a 3 Star victory.

Which Townhall Levels does CloneBone work?

Townhall 10 & 11

Pro’s of CloneBone
  • Very effective strategy for 11v10 dips nowadays
  • Extremely powerful on those bases which have offset ADs
Con’s of CloneBone
  • More a Clan War Strategy, using it for Trophy Pushing needs sometimes longer searching for bases you can use it against
  • Extremely Costly on Elixir
  • Max Level of Clone spell needed if you’re a TH11
Main Purpose of This Strategy
  1. Clan war.This strategy is mainly used for 11v10 dips, 11v11 & 10v10 triples. However, this strategy can also be used for 10v11 doubles on certain types of bases.
  2. Trophy Pushing. You can also use this strategy for Trophy pushing as a Th10(/11). But using this strategy above Titan league is recommended as the high amount of loot bonus which will compensate this army’s high Elixir cost. In lower Leagues, you probably have a loss on Elixir frequently.
Army Composition for CloneBone

  • 8-10 Dragons
  • 8-12 Balloons
  • Max Lava Hound and 1Max Balloon in the CC
You can replace a Dragon with 3-4 Wizards to back up your Barbarian King. The BK will tank for them while the Wizards can take out 1/2 offset AD(s), depending on the base design. AQ doesn’t need any backup troop for her ranged attack style. However, a Giant can be used to soak up some initial hits. You can also take some Wall Breakers (depending on the level) to break walls for her if there’s an AD beneath walls making it out of her range.

All in all, be wise about what you choose because you should know what you’re doing.

Spell Composition For CloneBone
  • 1 Clone spell
  • 3 Rage spell
  • 1 Poison or Haste spell
  • 1 Haste(if Th10)/ Rage (If Th11)
When and How to use your Clone Spell

The Clone spell is what differentiates this strategy from a normal DragLoon. This spell needs perfect timing and perfect usage to get most of the value out of it. Now, there are only two kinds of troops which you can and you need to clone: Dragons and Balloons. I’ll show you how and when to use it.

Cloning Dragons:

Cloning Dragons is only recommended when you have a maxed Clone Spell which is level 5. It can clone as much as 40 troop space which will create two more Dragons in the battlefield. Now, there’s one thing that all of you might not know is, cloned troops stay on the battlefield for a limited amount of time, so it needs perfect timing to use. If you use it too early, your cloned Dragons can disappear before even reaching the core. Always use the Clone spell when you’re in the core to add more firepower.

One more thing, always clones your leading Dragon because cloned Dragons are destined to disappear from the battle, you’ll want them to tank/die for your real Dragons since they are the ones who will be cleaning up the base at last.

Cloning Balloons:

The level of your clone doesn’t really matter as it can clone 5-8 loons depending on the level. Now, you can clone loons in different situations, like:
  1. Suppose there are 1/2 Offset ADs which can be directly targeted with loons (as you can see in the image). Then, you can drop your CC Lava Hound and Loon and clone the single Loon. With the help of a Haste/Rage spell and the Hound as their tank, Loons will take out a few defenses easily. Sometimes you won’t need that Hound to tank them.
  2. In case you’re dealing with a Single Target Inferno which can be deadly for Drags, you can clone your Loon(s) right before countering it. Under the Rage/Haste Spell, they will overpower the Inferno Tower(s) (However if you’re dealing with a multitarget Inferno, Cloning Drags will be the best option as Drags overpower the Multi-target Infernos).
  3. You can also clone your loons when Drags are busy Dealing with High HP buildings and there are too many defenses targeting them.
CloneBone Step by Step

With all that being said guys, let’s have a look at how this attack actually works. Let’s take these two bases as example

As you can see, Base 1 has offset ADs and Base 2 has centralized ADs (although they are on one side of the base). Mostly, you’ll see these two types of AD placement in different layouts so, I’ll show you what to do when you’re dealing with them.

Base 1:
Heroes:

In this kind of bases, your Heroes should be taking care of 1/2 ADs (the more, the better). Your BK, AQ and some Wizards are part of the first part of your attack, as you can see, The BK is deployed around 3 o’clock to tank for those wizards who will take out the 1st AD. Now, the correct funnel made the BK go to 2 o’clock where the 2nd AD is and the AQ will be deployed. She then will take care of that AD and then drags are good to go.
Deploying your DragLoon:

Dragons, followed by Balloons (and Grand Warden if you’re a TH11), should always be deployed where most of the air targeting defenses are. As in this one, the attacker chose to attack from the north-west side.
Now there are a couple of ADs still intact on the other side. Well, you’ve got your CC troop to deal with those. While your Drags are decimating the core, your lava hound followed by some loons (in this attack, the attacker used the clone spell on the CC loon which created more loons to support the Lava Hound as in Case#1), will take out some other defenses. Drop Rage/Haste spells as needed.Now that you’ve taken care of all the ADs, your drags should take care of the rest.
Base 2:
In this kind of bases, your heroes should be used for funneling which will prevent the drags from being distracted by any outside structure. As you can see I’ve deployed my Heroes on both sides of the bases to clear up some trash.
Now that you’ve made your funnel, deploy your dragons, spam your loons behind them and drop the CC hound to tank for all of your troops followed by your Grand Warden (if you’re a TH11). The Grand Warden ability, Eternal Tome, should be used properly to get the initial stage of your attack done with minimal loss.
Now, when you are in the middle of the base Drop your Clone spell on Drag/Loons as needed. Drop Rage Spells and Haste spells properly to help your troops do more damage in less time.
You’re done with your attack and if you’ve done it right, you’ll get away with a triple.

Conclusion

Guys, CWL Season 3 is now going on and every clan is getting very good outcomes with this attack. Finding its origin on CWL Season 2 Finals, it is now the most used 11v10 dip strategy. Although, 11v10 dips doesn't need much explanation as I’ve already explained 11v11.Thank you...