Articles by "Town Hall 10"
Showing posts with label Town Hall 10. Show all posts
Clash Of Clans Tips and Tricks, Attack Strategies, War, Farming, Trophy Layouts, Great Planning, Donations and More From TEC-Clashzz Team. Join Today
Farming Elixir Strategies & Tips | TEC Clashzz
Farming regular Elixir is getting harder and harder and here you will find the best tips to get Elixir.

If you’re Town Hall 10 or above you might have a problem gathering enough Elixir for your upgrades – TH11 & TH12 especially has a lot of problems upgrading the Grand Warden and the new levels for the troops.

With every upgrade to your troops and every Army Camp space you unlock, the cost of your army is getting higher and higher in Elixir and that results in lower profits in Elixir – sad but true.

Grand Warden, Siege Machines, Army Camps and the Lab Upgrades don’t come in cheap, so I decided to put together this guide here to help you farm the Elixir needed.

Elixir Farming Basics

Let’s start with some basic tips first before I will show you the strategies for farming.

I know quite a lot TH11+ farm in Crystal League which is totally fine if you’re going for Gold or Dark Elixir – regular Elixir, however, is a little different to farm as you always have at least 200,000 Elixir in army costs, no matter if you’re farming with Goblin Knife or any other cheap composition.

I recommend you to go up to Champions League as a big part of your profit in Elixir is coming from the League Bonus and the Star Bonus – and both are connected to the league you’re in.

Farming Elixir Strategies & Tips | TEC Clashzz

I’m personally farming in Titan League and you see that the League Bonus is making up completely for my army cost and all resources I find in a base is my net profit. The Star Bonus also comes in daily with a nice extra 850,000 Elixir and that let me farm additional 6-10 million Elixir per week – just by farming in Titan league instead of Crystal league as a Town Hall 12.

Of course, if you’re TH10 you should go to the Champions League to find good bases to attack

All you need to do is to get 70% destruction and you will have all your army costs back in your storages and that’s something you can get against pretty much all bases.

I know many people out there love to farm in the lower leagues to get the whale bases offering 1M loot, but you see that when you go for Elixir you will need to cover your troop costs and when you find a base offering 300k in Elixir (which is already pretty good and nothing you see around every corner there), you will only make 100k profit because the league bonus will not cover your army costs.

That’s just my opinion and experience after many years of clashing 

Army & Attacking Tips for Farming Elixir

First of all, your army is the second big thing you need to adapt when farming Elixir.

Might you remember my Dark Elixir Farming Guide? There’s a good explanation for why the army should be cheap in costs of what you’re farming.

Wrapping it all up, you can’t effectively farm Elixir if your army is expensive in Elixir.

So, obviously, the only thing you can do is adapting it so you use more Dark Elixir and get the costs in regular Elixir lower. I’m not saying your army should only cost Dark Elixir (this would also make you broke in Dark Elixir), but you can easily adapt armies.

Let’s take a look at this army adaption here:
Farming Elixir Strategies & Tips | TEC Clashzz

With pretty much the same army and attacking strategy, you can 70,000 Elixir by investing 700 Dark Elixir – a deal that will make you a good profit over time.

Let’s say you do 4 attacks per day, you will save 2 million Elixir without changing one single habit or style of attacking per week – and you can go even further by using more Haste Spells and Minions.

With such army adaption, you can change pretty much any army easily.

Attacking Strategies for Farming Elixir

I personally prefer LavaLoonian as you can also use this while heroes are upgrading because it’s not dependant on the Queen Walk and can still get you the 70% 1-Star & 2-Star needed with a nice profit in Elixir.

Still, BoWitch is less expensive in Elixir and those of you who are really into Bowlers can use it to get loads of Elixir.

Conclusion

Farming Elixir is a pain, especially when you just upgraded to a new Town Hall and see all the new stuff you need to upgrade while still paying for your army. I really recommend you to make a priority list of what you want to upgrade with your Elixir as it’s not possible to farm dozens of millions of Elixir that fast – I always have like one Elixir Upgrade and Lab research active.
Clash Of Clans Tips and Tricks, Attack Strategies, War, Farming, Trophy Layouts, Great Planning, Donations and More From TEC-Clashzz Team. Join Today
Farming bases will protect your loot, sounds reasonable right? Well, I’ve been searching a lot to update all the farming bases here to give you good suggestions which bases will really help you protect your loot.
Farming Base Layouts with Loot Protection | TEC Clashzz

What’s A Good Farming Base?

I don’t want to just throw base designs at you, so please let me explain you some things about farming bases before I will show you the layouts first.

A good farming base consists of different aspects but follows on the simple goal – protecting your Gold and (Dark) Elixir in the best possible way.

This sounds great in theory, but when looking at reality have you ever been doing an attack and not getting at least some Storages? Right, the first and most important lesson about farming bases is that they simply can’t protect everything and let you out of the defense without losing any resources – that’s simply not how the game is designed to be

Farming bases will help you protect certain loot (like Dark Elixir) or prevent that the attacker gets all your Storages easily – a good rule of thumb is that if your base consistently protects half of your storages it will work!

Half of it doesn’t sound good? Well, every storage can mean 100k of resources and when you multiply with the number of times you get attacked per day and then take a step back and look at how much every defended storage will help you save up resources you understand the real meaning of a farming base layout 

Farming vs Hybrid Base

I often discuss in the comments with people saying that the bases are bad because they are losing – so I ask what they are losing and it turns out that they mean trophies.

Farming bases are not intended to protect any trophies at all – the only reason why they protect the Town Hall is that inside the Town Hall there’s a noticeable amount of loot that you don’t want to give away for free.

Farming Base Layouts

Now check out the bases I have for you

Farming Base Town Hall 6 (TH6)

If you’re TH6, I recommend you to use this base to protect your resources from attackers. The sections in front of the storages will force troops away from the storages and help you protect some of them
Farming Base Layouts with Loot Protection | TEC Clashzz

Farming Bases Town Hall 7 (TH7)

This first base here focus on defending your Dark Elixir and therefore has the Gold & Elixir Storage more outside. You will need plenty of Dark Elixir and this base will help you defend it.
Farming Base Layouts with Loot Protection | TEC Clashzz
If you rather want to defend more, this second base primarily baits with the Town Hall in a semi-exposed location to get the attacker to come from the top and not get the central compartment with the storages.
Farming Base Layouts with Loot Protection | TEC Clashzz
However, this base still has a weakness for those attackers going primarily after loot!

Farming Bases Town Hall 8 (TH8)

This first base will focus more on protecting your Dark Elixir, but you can also expect it to protect half of your other storages as attackers either come from the top or the bottom of this base
Farming Base Layouts with Loot Protection | TEC Clashzz
The second base here works great as an allrounder farming base that protects your Dark Elixir and your other resources as well. The entry point on top looks easy to get the Town Hall, a bit with all that defensive power troops will get too weak to even get to the middle area of the base.
Farming Base Layouts with Loot Protection | TEC Clashzz
Attacking from the side will funnel the troops away, so this base is really nasty to attack

Farming Bases Town Hall 9 (TH9)

This base here will protect your Dark Elixir in the first place and also offers second layer protection for Gold.
Farming Base Layouts with Loot Protection | TEC Clashzz
When watching the replays you can see very well that this base will keep troops out of the core where your Town Hall & Dark Elixir Storage is located. This works good for Balloons & Hog Rider, but also Bowlers can’t hit it with their second hit.

The other compartments will funnel the troops on the outside ring so you won’t lose that many storages in an attack.

When maxing out TH9, you will probably come to a point where you have everything maxed but you’re still busy upgrading your royals and need tons of Dark Elixir for that – this base will help you out as it has one of the toughest Dark Elixir protection possible at Town Hall 9.
Farming Base Layouts with Loot Protection | TEC Clashzz
Attacking troops will get funneled to the outside and away from your Dark Elixir that is also protected by your defending heroes. The bottom side has an additional security feature with the tesla farm in front of the Town Hall.

Farming Bases Town Hall 10 (TH10)

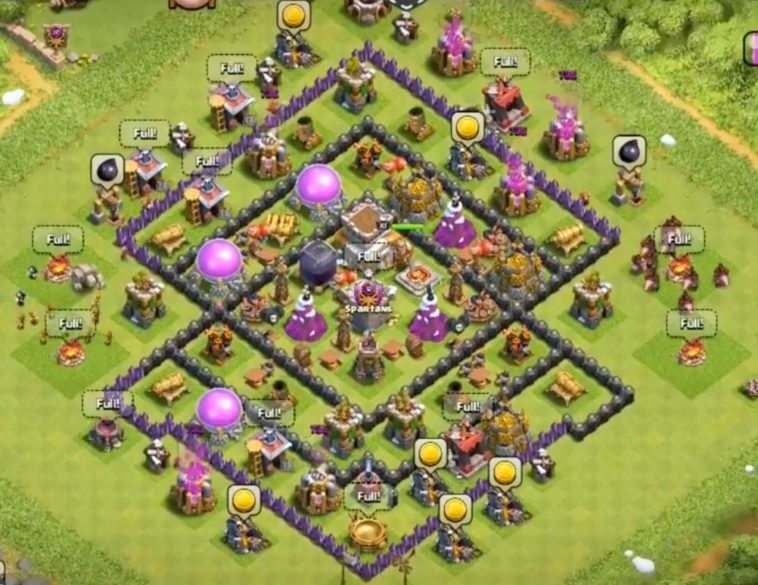
This base makes funneling for the attacker quite difficult and your defenses will do the rest

Enough attackers will simply fail to build a solid funnel and watch their troops walk around the core of the base without touching the core area.
Farming Base Layouts with Loot Protection | TEC Clashzz
Looking for a base that protects your Dark Elixir & other resources? This base works great  The Air Sweeper keep the core area clean from Balloons and it will be hard for an attacker to funnel in cleaning troops for that area. You should check out the replays I have linked below the base layout to see how well this base design is working.
Farming Base Layouts with Loot Protection | TEC Clashzz

Farming Bases Town Hall 11 (TH11)

This base here will help you protect your resources due to two reasons – the Dark Elixir is protected in the core that lots of attacks will not go into due to bad funneling and the storages are spread around the outside ring so it’s not likely that the attacker will get through the whole ring within the 3 minutes available.
Farming Base Layouts with Loot Protection | TEC Clashzz
This base has multiple pitfalls the attacker can fall for. The outside perimeter is not very easy to come by with a Queen Charge and just getting the walls open will not always mean she will go into the compartment. This can mess up the funnel building against this TH11 farming base.
Farming Base Layouts with Loot Protection | TEC Clashzz
All around the base, the point defense damage is keeping the pressure high and exploits any moment of bad concentration of the attacker

Clash Of Clans Tips and Tricks, Attack Strategies, War, Farming, Trophy Layouts, Great Planning, Donations and More From TEC-Clashzz Team. Join Today
Clan War Base Design for Winner | TEC Clashzz
The offense can win games, but defense wins championships – or in our case, Clan War Base Designs win Clan Wars. Most of you may focus on getting as many stars as possible, but did you realize that you also could have won your last war if your opponent got a few stars less than they actually got? Sure there is no base that can prevent a 3-Star against a million tries, but the more your opponents have to try to 3-Star your base, the fewer attacks they have left to collect stars in Clan War.

Protecting your base’s stars with a Clan War Base Design that rocks are just as important as successfully squeezing out as many stars out of your opponent as possible.

How Clan War Bases Work

Often times people think that Trophy Bases and War Bases are the same – both are intended to prevent that you lose stars, but that’s a huge mistake!
Trophy Bases try to get the attacker on the wrong foot and use the momentum of surprise with the short scouting time & maybe not optional troop setups plus the surprise of defending Clan Castle troops to make the attacker fail.

War Bases, however, can’t do that because after the first attack every attacker knows several trap locations and what troops will leave your Clan Castle. Also, your opponent can scout your base for hours and even see the exact defending radius by selecting the building.
Clan War Base Design for Winner | TEC Clashzz
You see that this makes a huge difference and the approach to Clan War is a different one. You don’t want to prevent the 1-Star or 2-Star, you want to prevent the 3-Star because those 3-Stars will win the war!

This is the idea behind a good War Base and you will give away your Town Hall quite cheap but design the core of your base in a way that will either take down all attacking troops or make the attacker run out of time!

Clan War Anti 3-Star Base Layouts

Now I have been putting together the best Clan War Bases here (and update them frequently like once every month).

War Bases Town Hall 7 (TH7)

This first base for Town Hall 7 for Clan War will work great against the two main attacks your base has to defend against – Dragons and Giants.
Clan War Base Design for Winner | TEC Clashzz
This base uses the large spaces between the buildings in the outside compartments to cloak your traps very well in the path of attacking ground troops. The Air Defenses are arranged in the sections that are impossible to be reached with Dragons right away, they will spread to the up and bottom side of the base while getting shot at by the Air Defenses.

Are you sick of seeing your base getting wrecked by Dragon attacks? This second base is your solution because it’s impossible to destroy it with a mass Dragon attack.
Clan War Base Design for Winner | TEC Clashzz
The general layout will drag the Dragons to the left and right while being in the range of the Air Defenses all the time – this will make them go down extremely fast. The Storages also keep them busy for a while with their loads of hitpoints – a good stronghold for your next Clan War

War Bases Town Hall 8 (TH8)

This first base layout here will serve you well with the dead zones in between the compartments and extremely solid trap placement.

The corner compartments serve as bulkheads with the Storages to hold back troops and keep them in the damage radius of the other defenses.
Clan War Base Design for Winner | TEC Clashzz
The Hidden Tesla Farm around the Town hall will block any kind of cheap suicide run for the Town Hall and force the attacker to invest more troops than he would like to invest.

This second base holds up great against Dragon or Balloon setups with the Storages in between slowing air troops down while the Air Defenses do their job taking them down
Clan War Base Design for Winner | TEC Clashzz
This TH8 War Base design is great if your base gets taken down by airborne troops frequently.

War Bases for Town Hall 9 (TH9)

This first base here protects the defending Queen very well and makes it extremely hard to take her out with a Queen Charge.
Clan War Base Design for Winner | TEC Clashzz
In the defensive replays I linked above you’ll see several cases where even TH10 or TH11 attackers couldn’t beat this base with Dragons or Valk

This second base is a great all-around holding up against Hog Rider, Witches, Valkyrie & of course, LavaLoon combinations with the resource bank at the bottom in front of the defending Archer Queen.
Clan War Base Design for Winner | TEC Clashzz
Pulling the Clan Castle is almost impossible and just a few Hogs will not do this because the outline defenses will take them down easily and the attacker has either to waste more troops or make a new attacking plan in a short time (that will very likely fail).

War Bases Town Hall 10 (TH10)

Let’s start with a very solid Anti 3-Star layout – it will force the attacker with Queen Charge to attack from the top due to the unreachable Inferno Tower in Single Mode at the bottom – the Seeking Air Mines will make that Queen Charge a short one and in case the attacker uses Bowlers he will fail at the middle of the base unable to get 3 stars.
Clan War Base Design for Winner | TEC Clashzz
If your base often gets attacked by Queen Charge & Bowler or Hog Rider attacks, this base is probably your best choice 

This second base here works great against Valkyries but also other attacking compositions with Golems. The general layout of the compartments will split up the troops and take them down merciless one by one before they can even reach the middle.
Clan War Base Design for Winner | TEC Clashzz
Also, the CC is extremely hard to lure and the defending Queen is so deep inside the base that any suicide attack will fail to take her down early in the raid.

War Bases Town Hall 11 (TH11)

This first base hold damage on all kind of attacks that use Healers (and there’s none working that doesn’t) high and the Air Defenses are in very uncomfortable spots for the attacker – so there’s a high chance that the Queen Charge will fail and make the whole raid not get 3-Stars.
Clan War Base Design for Winner | TEC Clashzz
The defending Heroes along with the Clan Castle are deep inside the base, so there’s no easy way to avoid running with the whole army into them.

This second base makes it hard for the attacker to build a proper funnel into the center of the base.
Clan War Base Design for Winner | TEC Clashzz
Even when the funnel is created, the base will still split up troops and this is the part where it gets very bad for the attacking troops due to the high damage a Town Hall 11 base offers.

Please comment below, If you have any suggestions.
Clash Of Clans Tips and Tricks, Attack Strategies, War, Farming, Trophy Layouts, Great Planning, Donations and More From TEC-Clashzz Team. Join Today
Trophy Pushing is one of the basic parts of the game, climbing the ladder, showing off how far you can get Ok, I admit trophy pushing is sometimes frustrating and the higher end of the ladder is not always a sunny place, but I will show you in this guide here what it takes to push trophies, why you should push trophies (at least from time to time) and what attacking strategies will get you to the top.

What Trophy Pushing is all about

Let me start off by telling you that trophy pushing is something that every Clasher will do at one point in the game for some good reasons – for some they only go for trophy pushing, but trophy pushing indeed has some advantages that you don’t want to ignore.

League Bonus! The higher the league, the higher the League Bonus you will earn with every attack. This sounds simple, but just multiply your daily attacks with the extra resources and you will see that there’s a lot more you can earn.
Extra Gems! Reaching Master League (1,000 Gems) & Champions League (2,000 Gems) will reward you with a ton of extra Gems, so pushing once to Champions League is mandatory as it will get you a 5th Builder or a ton of extra Gems.

Village Guard! In the higher Leagues, you will get a longer Village Guard – the Village Guard will protect your base from attacks while you can attack yourself without any deduction of the Guard. This means you can get in additional 2-3 attacks after your shield ran out and get a lot more trophies & loot every day. This Guard can be up to 4 hours!
So you see, trophy pushing will also help you farming and make your life easier in Clash of Clans

Is Trophy Pushing only for TH11 end game Clashers?

Often times, trophy pushing is associated with end-game or TH11 gameplay, but as you have seen above the benefits are real for every player plus you will practice attacking all kind of setups and practice attacking for Clan Wars or just in general to become a more solid Clasher

How does Trophy Pushing work?

Trophy Pushing has two parts – one is attacking and not losing trophies in your attacks and the other one is defending.

Trophy Pushing Attacking Strategies

Now let’s talk about the attacking part of trophy pushing.
If you visit this website frequently, you know that I often post attacking guides here, but not every attacking composition is that useful for trophy pushing.

You want a strategy that is able to hit as many bases as possible so you can do your daily attacks without waiting in the clouds and nexting all the time until you find an “easy” base you can hit.

Also, you will need a strategy that works consistently enough that you don’t lose attacks, even if you make small mistakes.

Look at this here:

You can see how one messed up attack can ruin you a lot of successful attacks!

That’s the reason why you need to be prepared and use a strategy that will prevent this happening.

Trophy Pushing vs Clan War Strategies

In Clan War, you have a lot of time scouting a base and even check out the exact radius of each defense, CC etc. plus you might even have info what’s in the Clan Castle or where traps are from a previous attack.

In return, war bases are specifically designed to not prevent a 1-Star, they want to prevent the 3-Star.

That’s the important difference as while trophy pushing you only have 30 seconds to prepare your attack and you won’t be able to tailor an army for the attack but use the one you have brought.

Also, the execution is different as many war bases have an offset Town Hall that you can easily get but an extremely tough core area.

The attacking strategies that work in clan war are quite similar to their trophy pushing counterparts, but the execution is different.

While war bases are different a lot of times, you will run into similar base setups in trophy pushing all the time.

Trophy Pusher Attacking Strategies

Now let’s take a look at the different strategies I have been putting together for you:
  • GoWiVa (TH8 – TH9)
  • BoValks (TH9 – TH11)
  • DragLoon (TH7 – TH11)
  • B*Witch with Miners (TH10 – TH11)
I know there are multiple more strategies, but those are the major ones that I think will set you up right now

GoWiVa (TH8 – TH9) Golem, Wizards & Valkyries

The general idea of this strategy is that you will use your Golems along with your Wizards to clean one side of the base to build your funnel. Then you open up the core area with the Earthquake Spells & send in your raged Valkyries to slice through the core like a hot knife through a piece of butter while the rest of your troops will gain you more percentage.

Troop Composition:
  • 2 Golems
  • 12 Wizards
  • 1 PEKKA (helps cleaning)
  • Fill with Valkyries (should be 8+)
  • 1-2 Rage Spell
  • 1 Heal Spell
  • 4 Earthquake Spells

When scouting bases, you always want to look out for bases that you can easily open up with your Earthquake Spells, like that:
Then you will drop your Golems along with your Golems and once the outside trash buidings are cleaned it’s time to send in your Valkyries and drop your Rage Spell & Heal Spell in the core – that will let them destroy the core completely and you’re set for a solid 2-Star victory

BoValk (TH9 – TH11) Bowlers & Valkyries

This strategy is expensive in Dark Elixir but also very powerful, especially against the ring bases you see everywhere.

You will use a Queen Walk on one side and some Bowlers with your King on the other side to create a wide funnel to the core where you will send in your Valkyries.

Troop Composition:
  • 5 Healer
  • 8 Wall Breaker
  • 2 Baby Dragons
  • 6-8 Bowler
  • 10 Valkyries
  • 4 Rage Spells
  • 1 Jump Spell
  • Poison Spell

This strategy work great against ring bases 

So, you will start your Queen Walk at one corner to one side and then your Bowlers with your Barbarian King to the other side to get something like that:
With all the Rage Spells, don’t hesitate to use them on your Queen & Bowlers if necessary, you will only need one to get the core down

Once your funnel is set (you see that when the closest core building is the closest building when you draw a line), you can send in your Valkyries to the core with an upfront Jump Spell.

Now you only need to drop your Rage Spell in the core and see how the Valkyries will take it down in a few seconds

DragLoon (TH7 – TH11)

Let’s come to one of the most popular and all-time classic trophy pushing strategy (and also the only one here that won’t shrink your Dark Elixir that much).

Attention TH7 & TH8! You just skip the Queen Walk part

You’ll perform a Queen Walk at the start and try to get one Air Defense and maybe the defending Queen.

Troop Composition:
  • 4 Healer
  • 4-6 Dragons
  • 10 Balloons (+ fill your CC with Balloons)
  • 5-8 Wall Breaker
  • 2-4 Rage Spells
  • 1 Clone Spell
  • 1 Poison Spell
You’ll start your attack with a Queen Walk into the Air Defense and clean off one corner part of the base. You can also add one or two Balloons to support your Queen and make that faster (but check the reach of the Air Defense first!)
After that, it’s time to send in your Dragons & Balloons full forces to crush the base.
The Dragons will tank for the Balloons, the Balloons will take defenses down and you will get your victory without a doubt

You just support them with Rage Spells & make sure to clone Balloons in the last part of the raid when you see there’s not many of them left

B*Witch With Miners (TH10 – TH11) Bowler & Witches

Probably one os the most used one for trophy pushing in the higher leagues and working also very effective against the ring base design you see there all the time.

You will build your funnel and then send in your forces. The Skeletons will distract defenses or stack up to deal a lot of damage while the Bowlers hit the second line structures and Healers keeping everyone alive.

So this strategy works well against ring bases as you will keep everyone alive and clean up while your Miners will approach the core.

Troop Composition:
  • 5 Healer
  • 5 Wall Breaker
  • 10-14 Bowler
  • 10 Miner
  • 3 Witches
  • 3 Rage Spells
  • 1 Jump Spell
  • 1 Heal Spell
  • 1 Poison Spell

You will start your Queen Walk in one corner and then start adding your Bowlers & Witches to it.
Your advantage is that the Healer will not just keep your Queen alive, they will also start healing the Bowlers which makes this group strong enough to clear the outside ring effective enough to get you the secure 1-Star.

Once you got half of the base cleared, you can take a shot for the core with your Miners. Drop your heal Spell in there, but most defenses are busy targeting your Bowler/Witch/Heroes pack so this should do it for the core
That’s it and will guarantee you the 1-Star and can give you the 3-Star

Last Trophy Pushing Tips

Ok, we got base layouts, general strategies & attacking strategies set – here are some final tips that I can give you

Work with Shields

Everyone has different schedules – some can do frequent attacks during the day, others can only attack in the morning once and a couple of times during the evening. It’s critical that you start using attacks as often as possible –  scouting plus attacking takes about 5-7 minutes, it’s often possible to do attacks, even if you’re busy during the day!

Keep the motivation up

Trophy Pushing can be hard sometimes and it’s easy to lose focus.

Set yourself small goals, like winning a certain amount of attacks each day. From my experience, don’t set yourself goals like gaining 30 cups per day, because then you might go for an attack to fulfill that goal and might screw up the attack.

It’s always your primary goal to NOT lose an attack. Gaining only a few trophies from a secure attack is better than losing a lot by going after a base that will reward a lot of trophies!

Defending CC Troops

Don’t forget to request defending Clan Castle troops before you end a session (or after an attack). Clan Castle troops can make the difference in defending trophies!

Conclusion

Trophy Pushing is nothing you do in a couple of days. If you’re doing it, for whatever reason you do it, you first have to be aware that it requires a lot of time.

Setting yourself daily goals helps a lot – Just set something that is realistic, like “today I will gain 10 Stars” or “I want to win 3 attacks every day”. The most important thing is that these goals are realistic because not being able to hit them will be negative motivation.

Good luck with pushing and have fun!
Clash Of Clans Tips and Tricks, Attack Strategies, War, Farming, Trophy Layouts, Great Planning, Donations and More From TEC-Clashzz Team. Join Today
It’s time for a new base design. All recent base designs I featured here have become very popular so that they can be beaten by more and more people. I gathered together the latest solid base designs for TH10, War Base Layouts and Farming Base Layouts.

Before I start, I’d like to give you some advice. If you choose to use an internet base layout – they sometimes get very popular, so people learn to handle and beat them. It always helps to adapt them a little bit.

Take note, some bases are rebuilt with a higher town hall account, but only the defenses and buildings from Town Hall 10 bases are used.

Town Hall 10 War Base Layouts

Going to Clan War as a Town Hall 10 is not easy. All you can do is prevent getting 3-Stared and sometimes you’re lucky and can protect a Star in a very close attack if your attacker makes mistakes.

The War Bases I have here is solid enough to take advantage of mistakes and shouldn’t get 3-Stared.

Anti 3 Star TH10 War Base Layout

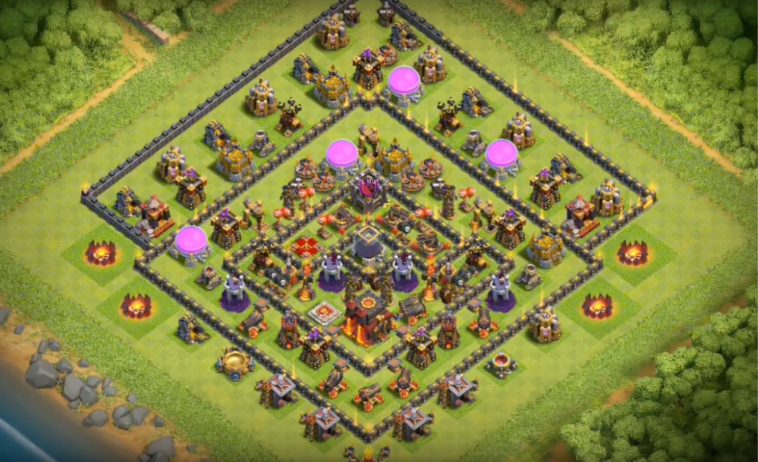
This base defends well because of the Inferno Tower placement that will funnel the attacking troops somewhere else and are well-protected with the Giant Bombs as well. Attacking directly into the Town Hall from the bottom side is also no good idea due to the defending Archer Queen and the Hidden Tesla farm right in front of it – this will cost the attacker many troops
The Air Defenses are populated in the northern part of the base so it’s hard to attack with Lava Hounds from somewhere else (because otherwise, they would split up from the Balloons or other troops they should protect with their hitpoints).

Town Hall 10 War Base Design

I really like the Inferno Tower placement in this layout because they will protect the Town Hall from exploding Lava Hound Pups and also this whole base puts the attacker into the tough spot to attack either in the defending Heroes or the Clan Castle – both are un-lurable.

Anti-Valkyrie & Anti-Bowler TH10 War Base

This Town Hall 10 War Base protects your Town Hall with the wall areas around it, especially against Valkyries and Bowlers as they tend to walk around this area a lot more than breaking through to the core area.
Here are also some more Clan War Base Layouts, in case you want some more hardcore bases

Town Hall 10 Trophy & Farming Base Layouts

At Town Hall 10 you will need a ton of Dark Elixir and here are two great bases that will help you with that.

Dark Elixir Protection Farming Base Layout Town Hall 10

This base layout does exactly what it says: protecting your Dark Elixir at any cost!
The Dark Elixir Storage is behind walls which makes it very unattractive for melee troops and Balloons won’t hit it with splash damage so the Dark Elixir Storage will remain untouched in many cases

Hybrid DE Farming Base Design for Town Hall 10

If you don’t want to put your Town Hall so much on the outside, you might want to use this base layout here.
The Inferno Towers will protect your Town Hall with their offset position and the Air Sweepers will force the attacker to attack into both Inferno Towers at the same time

TH10 Trophy Pushing Base Layout

This layout will protect your Town Hall with the wall structures around it along with the X-Bows and splash damage from the Wizard Towers – this base makes it hard to funnel tanks (air or ground) into the core area.

Anti Air Town Hall 10 Trophy Base Design

This layout protects will against air attacks. Attackers tend to attack from the right side due to the defensive Archer Queen location and will, first of all, get hit by several air traps. The outside defenses then will confuse Balloons enough so they will split away from Lava Hounds and at this point the attack is pretty much done for the attacker  In addition, a Queen Walk will also fail from the right side because Healers will step into the air traps early enough that it will shut the Queen down fast enough.

Clash Of Clans Tips and Tricks, Attack Strategies, War, Farming, Trophy Layouts, Great Planning, Donations and More From TEC-Clashzz Team. Join Today
This guide will be all about the new Th10 & TH11 attacking Strategy which was brought to light by two times CWL Champions “Dark Looters” – Yes guys, I’m talking about the CloneBone (DragLoon with Clone spell). Before, the June 2017 update, the Clone Spell was the least used Elixir spell because players could not get much value out of it for its 4 spell storage space. However, after the buff and a new level added, it is now being used with Dragons and Balloons more frequently which made this new strategy a very popular one among the TH10 & TH11 players who are dedicated to Clan War. Now, I’ll break this strategy into some little parts so that you guys can understand why this one is now trending.

How CloneBone works


This strategy works best against those bases which have offset Air Defenses. As you can see you’ll be able to take out a couple of ADs with your AQ and BK(with some wizards). And the other ones can be dealt with straight-targeting Balloons with the help of Rage/Haste spells.
But this doesn’t mean that you can’t attack those bases which have more like centralized Air Defenses that can’t be accessed with only Heroes as this example here
In these cases, your Heroes would be used for Funneling so that your Dragons go straight into the base. Once you’ve properly dealt with the ADs with minimal loss, other defenses won’t be able to stop you from getting a 3 Star victory.

Which Townhall Levels does CloneBone work?

Townhall 10 & 11

Pro’s of CloneBone
  • Very effective strategy for 11v10 dips nowadays
  • Extremely powerful on those bases which have offset ADs
Con’s of CloneBone
  • More a Clan War Strategy, using it for Trophy Pushing needs sometimes longer searching for bases you can use it against
  • Extremely Costly on Elixir
  • Max Level of Clone spell needed if you’re a TH11
Main Purpose of This Strategy
  1. Clan war.This strategy is mainly used for 11v10 dips, 11v11 & 10v10 triples. However, this strategy can also be used for 10v11 doubles on certain types of bases.
  2. Trophy Pushing. You can also use this strategy for Trophy pushing as a Th10(/11). But using this strategy above Titan league is recommended as the high amount of loot bonus which will compensate this army’s high Elixir cost. In lower Leagues, you probably have a loss on Elixir frequently.
Army Composition for CloneBone

  • 8-10 Dragons
  • 8-12 Balloons
  • Max Lava Hound and 1Max Balloon in the CC
You can replace a Dragon with 3-4 Wizards to back up your Barbarian King. The BK will tank for them while the Wizards can take out 1/2 offset AD(s), depending on the base design. AQ doesn’t need any backup troop for her ranged attack style. However, a Giant can be used to soak up some initial hits. You can also take some Wall Breakers (depending on the level) to break walls for her if there’s an AD beneath walls making it out of her range.

All in all, be wise about what you choose because you should know what you’re doing.

Spell Composition For CloneBone
  • 1 Clone spell
  • 3 Rage spell
  • 1 Poison or Haste spell
  • 1 Haste(if Th10)/ Rage (If Th11)
When and How to use your Clone Spell

The Clone spell is what differentiates this strategy from a normal DragLoon. This spell needs perfect timing and perfect usage to get most of the value out of it. Now, there are only two kinds of troops which you can and you need to clone: Dragons and Balloons. I’ll show you how and when to use it.

Cloning Dragons:

Cloning Dragons is only recommended when you have a maxed Clone Spell which is level 5. It can clone as much as 40 troop space which will create two more Dragons in the battlefield. Now, there’s one thing that all of you might not know is, cloned troops stay on the battlefield for a limited amount of time, so it needs perfect timing to use. If you use it too early, your cloned Dragons can disappear before even reaching the core. Always use the Clone spell when you’re in the core to add more firepower.

One more thing, always clones your leading Dragon because cloned Dragons are destined to disappear from the battle, you’ll want them to tank/die for your real Dragons since they are the ones who will be cleaning up the base at last.

Cloning Balloons:

The level of your clone doesn’t really matter as it can clone 5-8 loons depending on the level. Now, you can clone loons in different situations, like:
  1. Suppose there are 1/2 Offset ADs which can be directly targeted with loons (as you can see in the image). Then, you can drop your CC Lava Hound and Loon and clone the single Loon. With the help of a Haste/Rage spell and the Hound as their tank, Loons will take out a few defenses easily. Sometimes you won’t need that Hound to tank them.
  2. In case you’re dealing with a Single Target Inferno which can be deadly for Drags, you can clone your Loon(s) right before countering it. Under the Rage/Haste Spell, they will overpower the Inferno Tower(s) (However if you’re dealing with a multitarget Inferno, Cloning Drags will be the best option as Drags overpower the Multi-target Infernos).
  3. You can also clone your loons when Drags are busy Dealing with High HP buildings and there are too many defenses targeting them.
CloneBone Step by Step

With all that being said guys, let’s have a look at how this attack actually works. Let’s take these two bases as example

As you can see, Base 1 has offset ADs and Base 2 has centralized ADs (although they are on one side of the base). Mostly, you’ll see these two types of AD placement in different layouts so, I’ll show you what to do when you’re dealing with them.

Base 1:
Heroes:

In this kind of bases, your Heroes should be taking care of 1/2 ADs (the more, the better). Your BK, AQ and some Wizards are part of the first part of your attack, as you can see, The BK is deployed around 3 o’clock to tank for those wizards who will take out the 1st AD. Now, the correct funnel made the BK go to 2 o’clock where the 2nd AD is and the AQ will be deployed. She then will take care of that AD and then drags are good to go.
Deploying your DragLoon:

Dragons, followed by Balloons (and Grand Warden if you’re a TH11), should always be deployed where most of the air targeting defenses are. As in this one, the attacker chose to attack from the north-west side.
Now there are a couple of ADs still intact on the other side. Well, you’ve got your CC troop to deal with those. While your Drags are decimating the core, your lava hound followed by some loons (in this attack, the attacker used the clone spell on the CC loon which created more loons to support the Lava Hound as in Case#1), will take out some other defenses. Drop Rage/Haste spells as needed.Now that you’ve taken care of all the ADs, your drags should take care of the rest.
Base 2:
In this kind of bases, your heroes should be used for funneling which will prevent the drags from being distracted by any outside structure. As you can see I’ve deployed my Heroes on both sides of the bases to clear up some trash.
Now that you’ve made your funnel, deploy your dragons, spam your loons behind them and drop the CC hound to tank for all of your troops followed by your Grand Warden (if you’re a TH11). The Grand Warden ability, Eternal Tome, should be used properly to get the initial stage of your attack done with minimal loss.
Now, when you are in the middle of the base Drop your Clone spell on Drag/Loons as needed. Drop Rage Spells and Haste spells properly to help your troops do more damage in less time.
You’re done with your attack and if you’ve done it right, you’ll get away with a triple.

Conclusion

Guys, CWL Season 3 is now going on and every clan is getting very good outcomes with this attack. Finding its origin on CWL Season 2 Finals, it is now the most used 11v10 dip strategy. Although, 11v10 dips doesn't need much explanation as I’ve already explained 11v11.Thank you...